Create Constraints / Global Constraint / Default Constraint Dialog Box
There are three types of constraints:
- Global constraint—A global constraint is evaluated after all other constraints have been assessed. You use the global constraint to limit at a top level the volume of requests that can be submitted on a daily basis. For example, you could use the global constraint to limit the volume based on what the help desk could support on a daily basis. Once the global limit has been reached for that day, no more scheduling can occur. You configure a global constraint by clicking Edit Global Constraint on the Constraints view.
- Default constraint—The default constraint, when configured, applies in the event no conditional constraint could be found. Because conditional constraints apply based on conditions, it is possible that a user or computer may not qualify for any constraints. In this event, you still may want a constraint applied, hence the presence of the default constraint. You configure a default constraint by clicking Edit Default Constraint on Constraints view.
- Conditional constraint—Conditions can be set on constraints to determine whether a constraint should be applied. The same conditions found elsewhere apply here: OU , Group , Property , and Collection . When a user matches a condition for a constraint, no further evaluation is performed on other constraints and the settings for the constraint are applied. You configure a conditional constraint by clicking Add Constraint on the Constraints view, and then specifying conditions on the Conditions tab of the Create Constraints dialog box.
The procedure for configuring all three types of constraints is similar, except that you add conditions to a conditional constraint.
The Constraints dialog boxes include the following tabs:
General Tab
On the General tab of the Constraints dialog boxes, you specify the name of the constraint and define the time constraints.
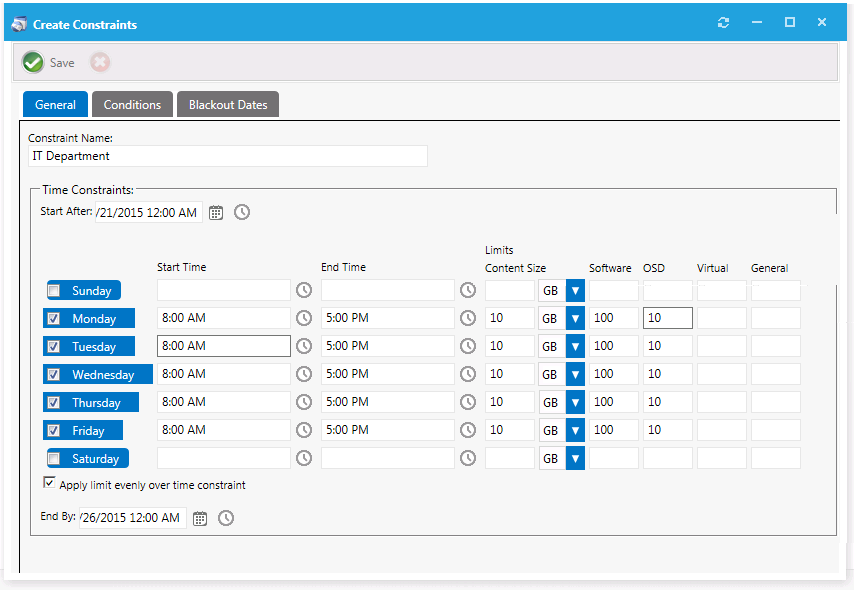
The General tab includes the following properties:
| Property | Description |
|---|---|
| Constraint Name | Enter a name to identify the constraint. |
| Start After / End By | Use to set the time range for the selected days that are available for the schedule. Start After —Opening date of deployment, End By —Date when the deployment will no longer be available |
| Start Time / End Time | To limit installation to a specific time range for a day of the week, specify the Start Time and End Time for that day. If no start or end time is specified, then any time is available. In this example, the requester would only be able to select a time range for installation between 8:00 a.m. and 5:00 p.m. on Monday through Friday. Saturday and Sunday would have any time available. |
| Limits Content Size | To limit the scheduling based on the total content size for items being delivered for others that meet the same constraint, enter a limit (in KB, MB, or GB). This limit is calculated by totaling the SCCM package size for the requested items for that day. In this example, if 10 users scheduled Microsoft Office (a 1 GB package) from the IT Department on Tuesday, the next user would hit the content size limit for that day and would not be able to schedule their installation for Tuesday. If the requester selects Wednesday, the same evaluation will occur for that day. |
| Type Limits: Software, OSD, Virtual, and General | Use to limit the volume of the specific class of catalog item (software, OS deployment, virtual package, or general) that can be requested. This allows you to limit by the type instead of limiting the time or data size. |
Conditions Tab
This tab only appears on the Create Constraints dialog box.
On the Conditions tab of the Create Constraints dialog box, you enter conditions to determine the application of a constraint.
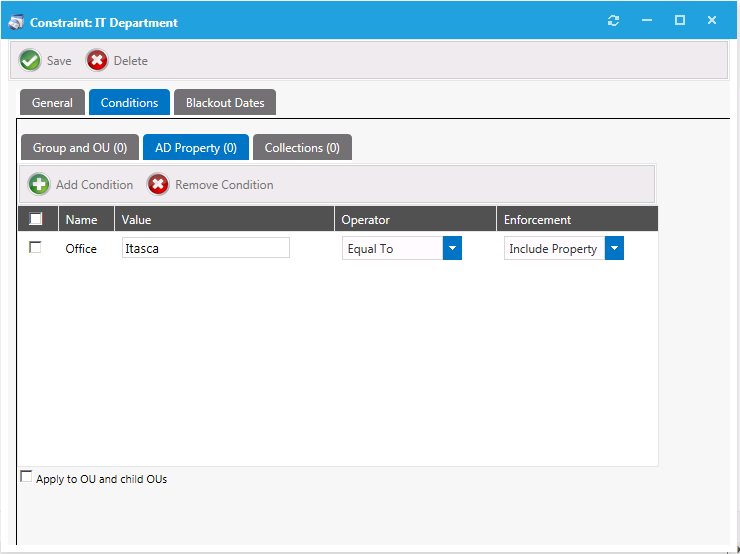
On the Conditions tab, specify the conditions to qualify a user or computer. When a condition match is found, that constraint will be used and no further evaluations will occur.
For detailed information on creating conditions, see the information on the Conditions Tab of the Role Properties dialog box.
You can use the AD Property subtab to allow for custom values of a variable type (starts with, contains, etc.).
Blackout Dates Tab
On the Blackout Dates tab, specify blackout dates to limit scheduling options such as holidays. The requester will not be able to select a date from the scheduler if it is blacked out.

When using a user readiness record to manage a deployment, as described in Using User Readiness Records to Schedule Users for OS Deployment, you can also specify blackout dates. If a constraint with specified blackout dates also applies to a software deployment that is managed by a user readiness record with specified blackout dates, the blackout dates will be combined.